How To Create An Amazon Seller Account From Pakistan Without LLC
Selling on Amazon has become a very lucrative business. Moreover, e-commerce as a whole has experienced significant growth. Suppose you plan to sell online on Amazon from Pakistan but are worried that opening a seller account from Pakistan is impossible. Let us correct you. Yes, you can open an Amazon seller account from Pakistan without LLC. This straightforward guide will show you how to make an Amazon seller account. We’ll cover what documents you need, how to verify your account, and tips for scanning your papers. We’ll help you start selling on Amazon without dealing with LLCs.
Below is how you can create an Amazon seller account from Pakistan. Before making a seller account, understanding the required documents and the process of scanning them is essential. All the necessary information is provided below. We have divided our blog into two parts.
Part 1: Documents You Need for an Amazon Seller Account
This section will list all the essential documents you must gather to create your Amazon seller account.
Part 2: How to Create an Amazon Seller Account from Pakistan (Without an LLC)
In the second part of our blog, we’ll provide easy-to-follow steps on how to set up your Amazon seller account from Pakistan, all without requiring an LLC. This guide will make the account creation process straightforward for you.
Part 1: Documents Required For Amazon Seller Account:
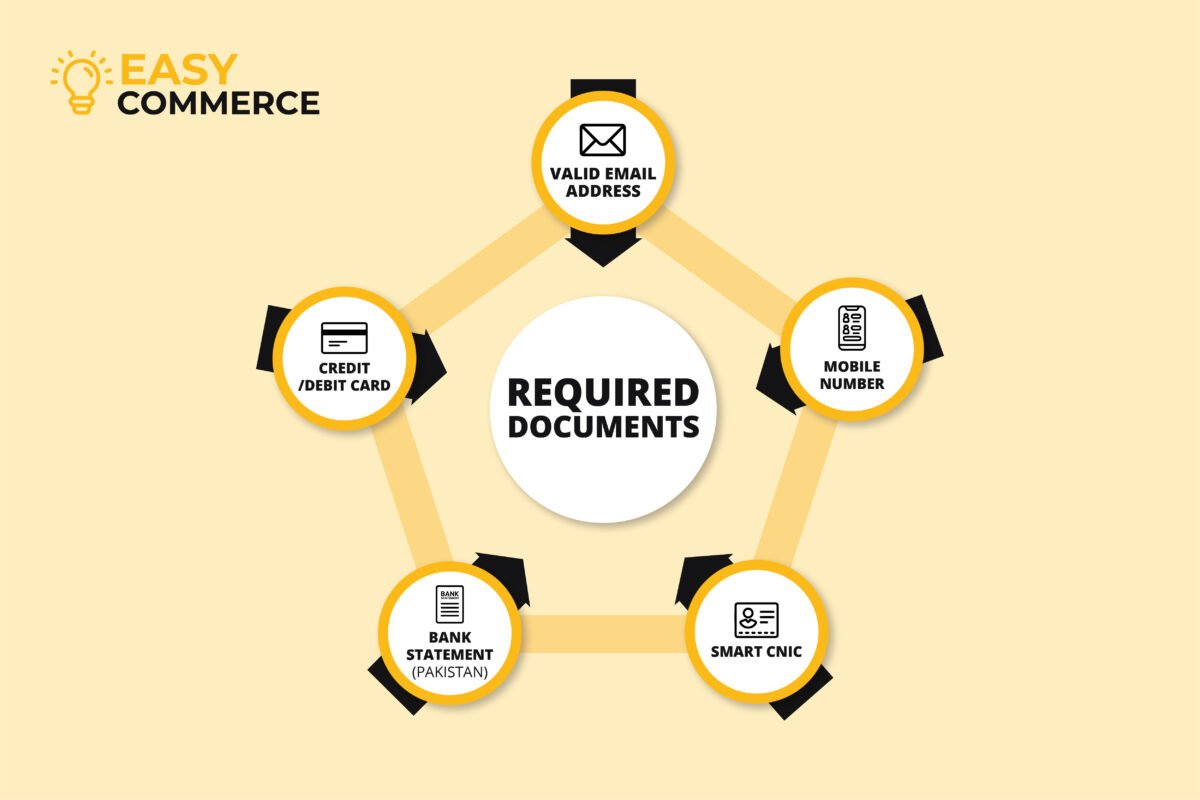
Below are the documents required for the Amazon seller account.
1. Email Address:
You’ll need a valid email address to register your Amazon seller account (Example Gmail)
2. Mobile Number:
Note: +92 (Pakistan) numbers are currently not accepted for Amazon OTP. Below are a few alternatives:
- You can use your friend/family mobile number from Overseas and later move to Google Authenticator once the account creation is completed.
- OR, You can use A USA working mobile number for account verification Example VYKE (YOU CAN BUY FOR $3)
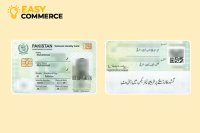
3. Identification Documents:
You must provide your Smart NIC (National Identity Card) identification documents to ensure they are not expired. If you do not have a Smart NIC, you can also use your Passport.
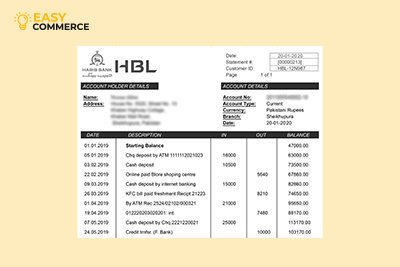
4. Bank Statement:
- Your bank statement is essential, as it helps Amazon verify your address. Make sure your bank statement includes your name and address.
- Note that specific payment options like EasyPaisa and JazzCash are not usually accepted.
- It must be a street bank like Meezan, Askari, HBL, UBL or similar.
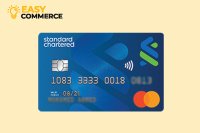
5. Credit/Debit Card:
- You’ll need a credit or debit card that is internationally activated. If you don’t have one, consider signing up for services like Sadapay or Nayapay.
- You can also use your bank card, which is activated for online and international transactions – any bank’s debit or credit card example, Meezan Bank or HBL etc. The card must be a Visa or Mastercard – Paypak and Union Pay will not work.
6. Payment Method:
Amazon usually uses payment methods like Payoneer or Hyperwallet to disburse your earnings. You can sign up for one of these platforms to receive your Amazon sales payments.

7. Additional Verification:
Sometimes, Amazon may request extra verification. This can include providing:
- Utility bills (Gas, electricity, and water) should show your name and address.
- Be prepared for a video call with Amazon for further verification.
Scanning Documents Requirement For Amazon Seller Account:
We’ve put together a simple guide outlining the documents and steps required.
NIC (National Identity Card):
- Scan both the front and back of your NIC.
- Leave white space around the corners to make the rounded edges stand out.
- Consider getting your NIC scanned at a shop for better quality, which can improve your chances of approval.
- You can also scan your id using an advanced camera phone, such as a newer version of iPhone or Samsung Galaxy Series.
Scanning Resolution:
- Ensure that your scanned documents have a resolution of 600 DPI (dots per inch).
- This high resolution ensures that all details are captured clearly.
- Scanning should not be blurry or fuzzy.
Passport:
- When scanning your passport, ensure all the information is clear and legible.
- Please pay special attention to the second page where your signature is compulsory; missing it could lead to account rejection.

Bank Statement:
Your bank statement should include the following, which are very important for verification purposes.
- Bank logo
- Bank name
- Your name
- Your permanent address
Bank Statement Authentication:
- You can log in to your online banking and download the bank statement directly from there. You can submit the same document pdf file to Amazon.
- You can also receive your bank statement from the relevant bank’s branch. If you’re obtaining your bank statement directly from the bank, ensure that it is, and these authentication marks are compulsory for document validity.
- Signed by a bank representative
- Stamped with the bank’s official seal
Note: We recommend using your online banking bank statement for a higher chance of approval.
Note 2: The Bank statement must have your full name and address which should be the same as per the details you have already provided to Amazon.
Part 2: Amazon Seller Account Creation From Pakistan (Without) LLC- Step By Step Guide:
Opening a seller account is your first step towards becoming an Amazon seller. Follow these simple steps to create your Amazon seller account.
1. Visit Amazon Seller Central for Amazon seller account
Open Google Chrome and go to the website sellercentral.amazon.com.
2. Choose “Learn” and Sign Up as a Seller
On the first page, click on the “Learn” option. Scroll down to the bottom and click , “Just have a few items to sell? Sign up to become an individual seller” (no upfront fees).
Note: For a quicker approval process, we recommend signing up for a professional account (not individual account). You can go to Amazon seller-central and click sign up right at the top to create a professional selling account. The fee for the professional account is $39.99/month.
Note: You can upgrade your individual account to professional and vice versa anytime you like.
3. Sign In or Create a New Account
If you already have an Amazon account, sign in with your existing ID. If not, create a new one.
4. Provide Your Information
Fill in your name (matching your bank statement) email address, and create a password.
5. Complete Human Verification
Solve the puzzle provided by Amazon for human verification.
6. Verify Your Email
Amazon will send a verification code to your email. Copy and paste the code and click “Verify.”
7. Add a Valid Phone Number
Enter your valid phone number. For Pakistan, use the format 92+, your number without the leading zero.
Note: +92 (Pakistan) numbers are currently not accepted for Amazon OTP. Below are a few alternatives:
- You can use your friend/family mobile number from Overseas and later move to Google Authenticator once the account creation is completed.
- OR, You can use A USA working mobile number for account verification Example VYKE (YOU CAN BUY FOR $3)
8. Verify Your Phone Number
Amazon will send an OTP to your phone number. Enter the OTP and click “Create Your Amazon Account.”
9. Begin Seller Account Setup
Read the information on the first page and click the “Begin” button.
10. Provide Business Information
Choose your country (e.g., Pakistan).
11. Select Business Type
Select “None – I am an individual.”
12. Fill in Personal Details
Enter your first name, middle name (if applicable), last name, country of citizenship, country of birth, and date of birth.
13. Verify Identity
Upload your National Identity Card (NIC) or passport.
14. Provide NIC Details
Fill in the country that issued your NIC number (without dashes), and NIC expiry date.
15. Enter Residential Address
Your residential address should match your bank statement. Add your zip code, street address, city, state, and region.
16. Add Payment Information
Fill in your credit card number, expiration date, and cardholder’s name.
17. Create Your Store Name
Come up with a unique and creative store name.
18. Skip Universal Product Code
If you don’t have a Universal Product Code (UPC), click “No.”
19. Confirm Manufacturer/Brand Ownership
Indicate whether you are the manufacturer or brand owner of the products you want to sell. Choose the appropriate option.
20. Upload NIC and Bank Statement
Upload clear images of your NIC (front and back) and your bank statement. Click the “Next” button to proceed.
21. Wait for Approval
Amazon will review your information and documents. It may take up to 2 days to receive an email confirming your seller account. If there are issues, Amazon will request document resubmission.
Amazon Individual Account Vs Professional Account
Let’s compare the difference between Amazon Individual vs Professional Accounts.
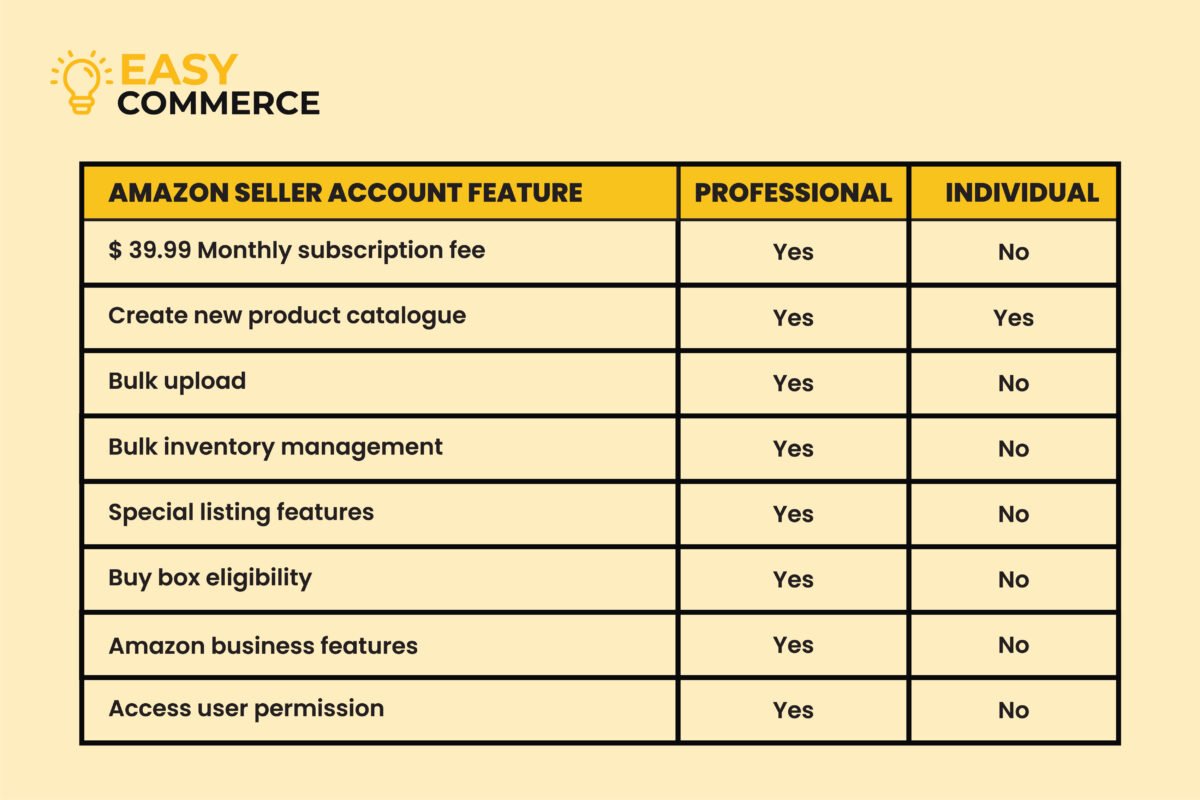
Amazon Individual Account:
- No monthly subscription fees.
- You pay a per-item fee of $0.99 when an item sells. Amazon charges a 17% fee when closing a category.
- You can create new product pages in the Amazon catalogue.
- Inventory management is not available through feeds, spreadsheets, and reports.
- You cannot export or manage orders using order reports and order-related feeds.
- Amazon sets shipping rates for all products.
- Promotions, gift services, and special listing features are not accessible.
- Not eligible for listing placement in the featured Offer.
- You cannot utilize Amazon Business features to create unique pricing and offerings for business customers.
- Access to user permissions and granting access rights to other users is not provided.
Amazon Professional Account:
- In a professional account, you are required to pay a $39.99 monthly subscription fee.
- Amazon charges a 17% fee when closing a category.
- You can create new product pages in the Amazon catalogue.
- Inventory management is possible using feeds, spreadsheets, and reports.
- You can export and manage orders using order reports and order-related feeds.
- Amazon does not set shipping rates for all products.
- You can run promotions, gift services, and special listing features.
- Eligible for listing placement in the Featured Offer.
- You can utilize Amazon Business features to create unique pricing and offerings for business customers.
- Access to user permissions and granting access rights to other users is available.
FINAL THOUGHTS:
In conclusion, after setting up your seller account on Amazon, the crucial next step is carefully choosing the perfect product to sell on the platform. This decision requires thorough research, considering market demand, competition, and profitability. Finding the right product is essential for a successful Amazon selling journey, so take your time and make an informed choice to maximize your chances of success.